 #carvel in Kubernetes Slack
 GitHub
Documentation for version v0.38.0 is no longer actively maintained. The version you are currently viewing is a static snapshot. For up-to-date documentation, see the latest version.
How it works
Overview 
Let’s get an idea of how ytt works by looking at the high-level concepts and flow.
The ytt Pipeline 
When you invoke ytt …
$ ytt -f values/ -f config/
… you can think of it as a pipeline in four stages, looking something like this:
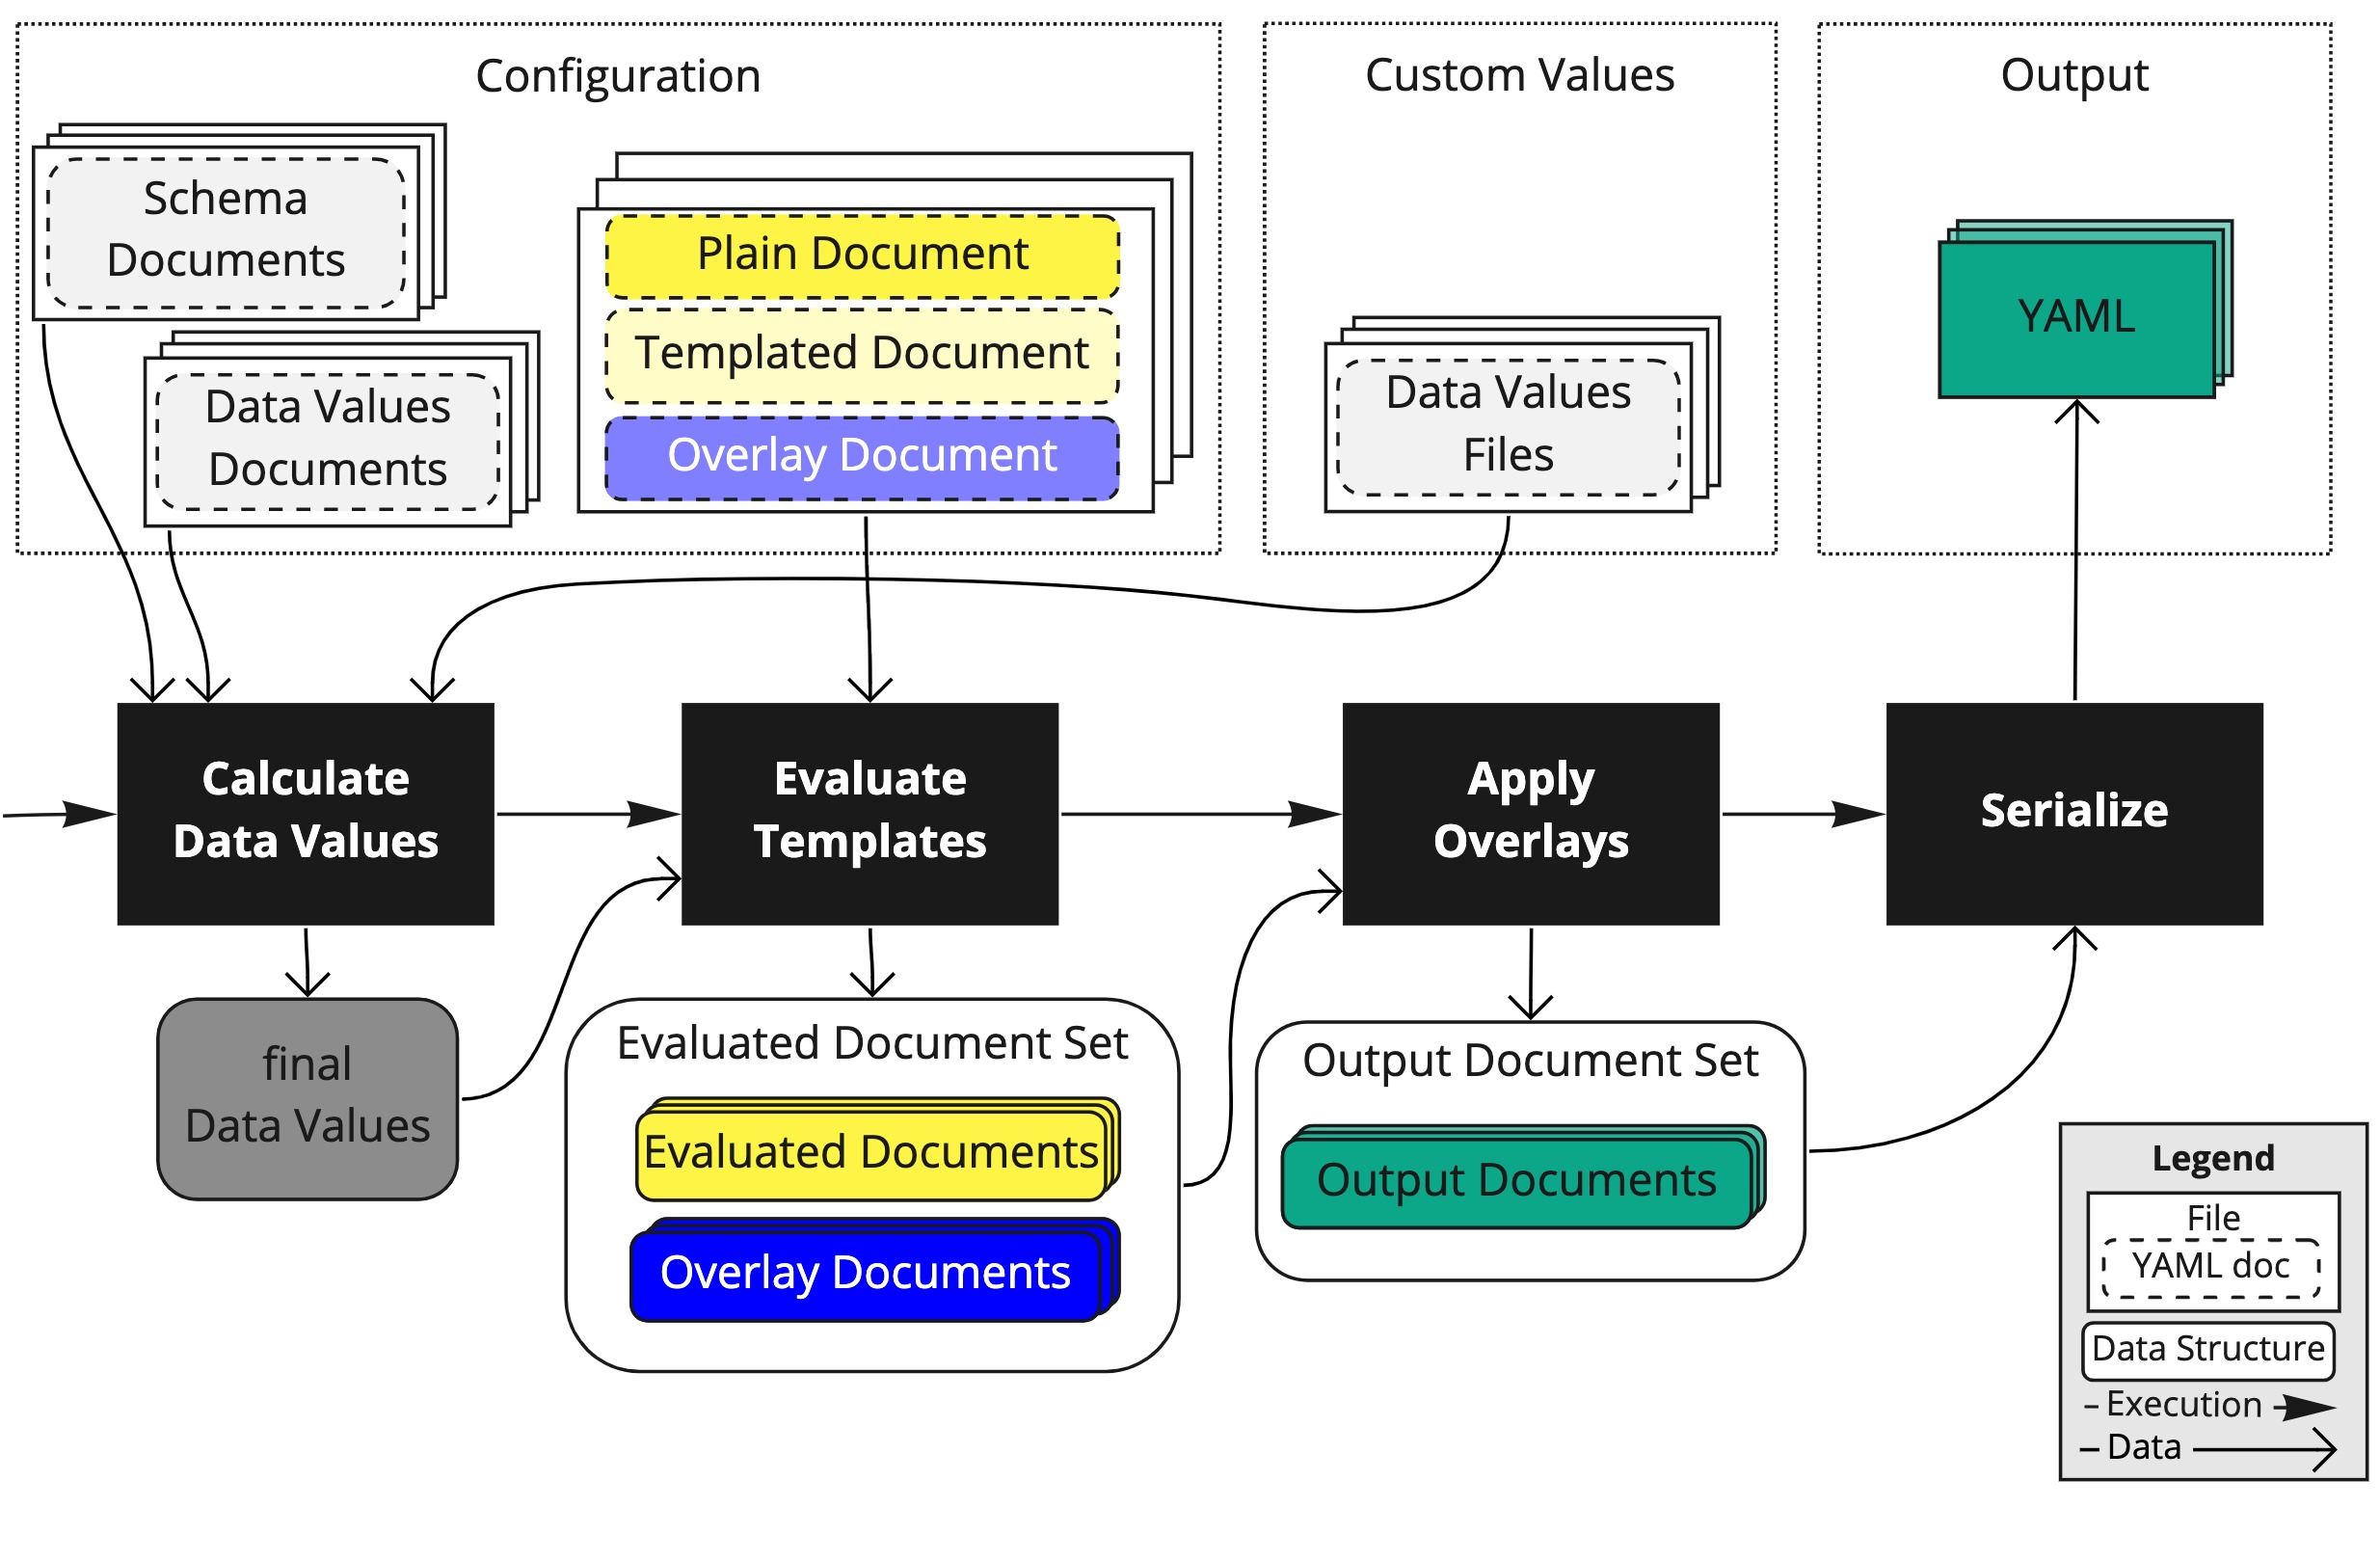
(Input documents (grey, pale yellow and blue) flow through four pipeline steps (black), into evaluated intermediary documents (bright yellow and blue), and combined ultimately into plain YAML output (green).)
The Input Files 
The top-left section of the diagram shows the input files.
Let’s explore each, after a general note about files and documents.
About YAML files and their documents 
If a given “input file” contains one or more ytt annotations (i.e. lines that contain #@), it’s a ytt template.
This is a ytt template…
---
foo: 14
bar:
#@ for/end name in ["Alice", "Bob", "world"]:
- #@ "Hello, " + name
… and, this is plain YAML …
---
foo: 14
bar:
- Hello, Alice
- Hello, Bob
- Hello, world
Each file can have one or more YAML documents in them (separated by ---). (from here on, we’ll refer to YAML documents as just “documents”.)
foo: here's the first document (the initial `---` is optional)
---
bar: this is a separate document
---
qux: third document's a charm!
Now, let’s look at each type of document, in turn.
Data Values Schema Documents 
If a document begins with the @data/values-schema annotation, we call it a “Data Values Schema Document” (the light grey dashed box in the illustration, above).
#@data/values-schema
---
instances: 1
...
These files declare variables (Data Values) by setting their name, default value, and type.
Data Values Documents 
When a document starts with the @data/values annotation, it’s called a “Data Values Document” (the light grey dashed box in the illustration, above).
#@data/values
---
instances: 8
...
These contain the variables that provide values for templates (explained in more detail, below).
Plain Documents 
If a document has no ytt annotations, we’ll call those “Plain Documents” (like the bright yellow item in “Input Files”, above).
---
notes:
- this will be part of the output
- it does get parsed as YAML, but that's about it
These documents need no processing (outside of being parsed as YAML), and are included as part of the output of the pipeline.
Templated Documents 
If a document does contain templating (i.e. lines containing #@) it’s known as a “Templated Document” (the pale yellow one, above).
#@ load("@ytt:data", "data")

---
apiVersion: apps/v1
kind: Deployment
metadata:
  name: my-app
spec:
  replicas: #@ data.values.instances
...
These documents are — after being processed — also included as part of the output of the pipeline.
Overlay Documents 
When a document starts with the @overlay/match... annotation (i.e. above the ---), it’s referred to as an “Overlay Document” (denoted as a pale blue item, above):
#@overlay/match by=overlay.all
---
metadata:
  #@overlay/match missing_ok=True
  namespace: staging
...
These documents describe edits to apply just before generating the output (described in detail, below).
Kinds of Documents in Input Files 
Note that an “input file” can contain any combination of “Plain Documents”, “Templated Documents”, and “Overlay Documents”. In contrast, “Data Values Schema Documents” and “Data Values Documents” must be in their own “Input File”, as illustrated above.
The Pipeline Steps 
Now that we have a sense of the four kinds of inputs, let’s explore what happens at each step in the pipeline.
Step 1: Calculate Data Values 
As the first black pipeline box shows, above:
- process all the “Data Values Schema” documents (light grey input) — evaluating any templating in them;
- merge those documents, in order, generating a “Data Values” document populated with default values and type information.
- process all the “Data Values” documents (light grey input) — evaluating any templating in them;
- merge those documents, in order. That is, start with the first document and then overlay the second one onto it; then overlay the third document on top of that, and so on…
The result of all this is the final set of values that will be available to templates: the dark grey “final Data Values”.
Step 2: Evaluate Templates 
Next, evaluate the remaining templates (all the other kinds of “Input File” documents):
- “evaluate” means executing all of the Starlark code: loops are run, conditionals decided, expressions evaluated.
- one notable exception is overlay annotations (i.e. those that start with
@overlay/...), these are deferred until the next step. - a template accesses input variables (i.e. the Data Values calculated in the previous step) via the
@ytt:datamodule;
The result of all this evaluation is a set of YAML documents, configured with the Data Values (shown as “Evaluated Document Set” in the diagram, above).
Step 3: Apply Overlays 
Note that the “Evaluated Document Set” (see the output from the second step in the diagram) contains two groups:
- “Evaluated Documents” — these are the pile of “Plain Documents” and evaluated “Template Documents” from the previous step. These are a bright yellow.
- “Overlay Documents” — these are the input file “Overlay Documents” wherein everything except the
@overlay/...annotations have been evaluated. These are a bright blue.
With these in hand:
- apply each “Overlay Document” on top of the full set of “Evaluated Documents”.
You can think of each overlay as like a SQLupdatecommand:- the value of it’s
byargument is like awhereclause that selects over the whole collection of “Evaluated Documents”. For example,selects all of the documents which contain a key#@overlay/match by=overlay.subset({"kind": "Deployment"}), ... ---"kind"whose value is"Deployment" - for each of the documents selected, apply the overlay on top of it. This is like a series of
setclauses, each updating a portion of the document. For example,sets each “Deployment”’s#@overlay/match by=overlay.subset({"kind": "Deployment"}), ... --- #@overlay/match-child-defaults missing_ok=True metadata: labels: app: frontendmetadata.labels.appto be"frontend".
- the value of it’s
- repeat that process for each “Overlay Document”, in order.
The result is (shown as “Output Document Set” in the diagram, above) — the finalized set of YAML documents, in memory. Which leaves one last step…
Step 4: Serialize 
This is simply iterating over the “Output Document Set”, rendering each YAML Document (“Output Files”, above).
The result is sent to standard out (suitable for piping into other tools). If desired, the output can be sent instead to disk using the --output... flags.
Further Reading 
We’ve scratched the surface: an end-to-end flow from pre-processing inputs, processing templates, post-processing overlays, and finally rendering the resulting output.
To learn more about…
- Data Values Schema
- learn about writing Schema for Data Values
- read-up on the details in the “Data Values Schema Referce” material
- work with a complete example from the source:
carvel-dev/ytt/../examples/schema
- Data Values…
- poke at a working example in the ytt Playground: Load Data Values example
- read-up on the details in “Using Data Values”
- work with a complete example from the source:
carvel-dev/ytt/../examples/data-values
- Templates…
- learn Starlark by example in the first bunch of “Basics” examples.
- read-up on
ytt’s built-in libraries to encode/decode, hash, regex match over data. - get an helpfully abridged tour of Starlark in “Language”
- Overlays…
- walk through the “Overlays” group of examples:
- go to the ytt Playground
- find the “Overlays” group header, click on it to reveal the group (you can close the “Basics” group by clicking on it).
- read an introduction at “Using Overlays”
- walk through the “Overlays” group of examples:
(Help improve our docs: edit this page on GitHub)